
Pool Cover Installation Guide

Every pool cover comes with a detailed set of installation instructions. Our online directions are posted as an outline of the simple processes required to install an inground pool cover. Installation of an average size pool cover on a typical concrete deck should take between 2 & 4 hours with 2 people completing the work. Hundreds of home owners install their own Ameri-Brand pool covers every year with professional results. Feel free to contact us if you should need additional information or assistance!
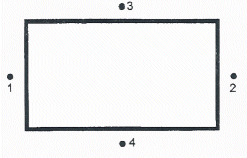
Installing a Rectangular Cover
Step 1
Measure the cover to determine the exact overlap:
- 5 x 5 strap spacing has approx. 12" of overlap (varies between 10-15")
- 3 x 3 strap spacing has approx. 18" of overlap (varies between 15-22")
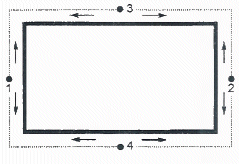
Step 2
Stretch the cover over the pool and use buckets of water to hold it in place. Adjust for correct overlap on all sides. If the cover has cutouts, adjust for proper alignment now.
Step 3
Anchor points should be located 18" form the edge of the cover (not the edge of the pool) and in line exactly with the strap.
See page 3 for instructions on anchor installation. Begin installing anchors as shown right:
Step 4
Install springs on the straps for which you have just installed anchors. Tighten straps until springs are compressed 50%.
Step 5 (Optional)
Snap a chalk line 18 inches from the edge of the cover on all four sides. (This should be in line with the anchors you just installed) This will be your anchor line and ensures that all anchors will be aligned.
Step 6
With the center straps of the cover secured, work your way to the corners as shown right:
Step 7
Inspect your installation. Make sure that all springs are no more than 50% compressed and that the cover is taut across the pool.
Installing a Freeform Cover
Step 1
Stretch the cover over the pool and use buckets of water to hold it in place. Adjust for correct overlap on all sides. If the cover has cutouts, adjust for proper alignment now.
Step 2
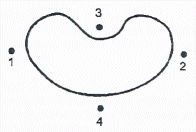
Anchor points should be located 18" from the edge of the cover (not the edge of the pool) and in line exactly with the strap.
See page 3 for anchor installation instructions. Begin installing anchors as shown right:
Step 3
Install springs on the straps for which you have just installed anchors. Tighten straps until springs are compressed 50%

Step 4
With the center straps of the cover secured, install the rest of the anchors as shown right:
Step 5
Inspect your installation. Make sure that all springs are no more than 50% compressed and the cover is taut across the pool.
Anchor Installation
| See the video: How our anchors work |
Concrete Decks:
- Using a rotary hammer drill with a 3/4 inch masonry bit, drill 2 inches into the deck.
- Put the brass casing into the hole and tamp it down lightly with the Tamper Tool until flush with the deck. Do not pound the anchor in with the anchor insert in place.
- Screw the brass insert into the casing leaving about 1/3 of the anchor insert above the deck to secure the spring.
Wood Decks:
- Using a drill with a 1 1/2 inch self-boring bit, countersink a hole 1/8 inch deep into wood deck.
- Directly in the center of that hole, drill a 3/4 inch diameter hole into the deck at least 2 inches deep.
- Insert the flange portion of the anchor into the deck and secure to deck with wood screws provided.
- Screw the insert into the flange leaving about 1/3 of the anchor above the deck to secure the spring.
Brick or Stone Decks:
Decks made with brick or stone require a steel sleeve to support anchors. These may be made from 3/4" inside diameter conduit cut in 14"-18" pieces.
- Using a rotary hammer drill with 1 inch masonry bit, drill through brick or stone to soft ground. (Be careful not to crack bricks or stone when drilling).
- Tap anchor into end of conduit.
- Using a block of wood and a hammer, drive the anchor sleeve into the ground flush with the deck.
- Screw the brass insert into the casing leaving about 1/3 of the anchor above the deck to secure the spring.
Lawn or Planters:
This method can be used in lawn or planters only if 10% or less of the straps are anchored in this manner.
Raised Areas
When installing a cover with a raised area, this section of the cover must be installed first.
Walls, waterfalls, or elevated spas must be treated specially since there is no deck available to secure an anchor. Eyebolts will be needed to install a cover in these areas and are not supplied. Due to the many different possibilities, the specific eyebolt necessary must be determined on site.
Step 1
Locate the section of the cover showing no straps. You will find a d-ring with a carabineer under the edge of the cover.
Step 2
Stretch the cover over the pool making sure that it is positioned correctly in the raised wall area. Use buckets of water to hold the cover in place around the pool. Adjust for exact overlap on all sides with sufficient deck. Remember, there will be no overlap in raised wall area.
Step 3
Determine where the eyebolts will be drilled into the obstruction based on the carabineer locations. Install eyebolts as per the manufacturer's instructions.
Step 4
Snap the cover to the eyebolts and then proceed with the standard installation for the rest of the cover.
Spring Installation
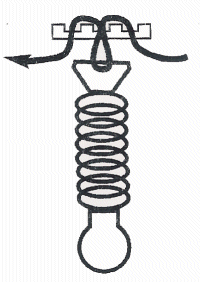
Step 1
Pull end of strap through first opening in buckle.
Step 2
Continue down through middle opening.
Step 3
Place flat end of spring on strap.
Step 4
Pull strap back up through middle.
Step 5
Finally, pull strap down through remaining opening.