 |
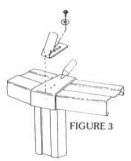
A. Attach the mounting brackets as shown in Figure
3 on the top cap of each vertical support. The mounting bracket should
be located near the outside edge of the top cap, centered on the cap, but
not extending past the outside edge. Mark on the top cap, with an
indelible marker, the location of the two outer holes on the mounting bracket,
leave the center hole open. See Figure 3.
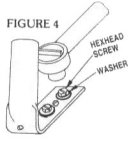
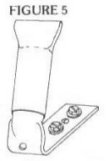
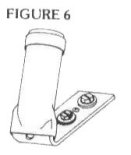
WARNING!!! B. You must drill through the top cap and the rail to reach the metal plate on the top of your vertical support. Drill your holes with the 3/16" drill bit. (Or the appropriate bit for the anchor being used!) DO NOT LET THE SHAVINGS FALL INTO THE POOL WHILE DRILLING. It is best to have a vacuum ready and running while you drill to take away the shavings. See Figure 3. C. Attach each screw with a ratchet wrench and a 3/8" socket or slotted screwdriver. (If you are using the Dry Wall anchors, they normally require a phillips head screwdriver) See Figure 4. D. Install all of the remaining brackets in the same way. E. Place a vinyl bracket jacket (found in the vinyl cover carton) over each bracket as shown in Figure 5. It needs to cover the connection with the universal rafter to prevent scratching of the vinyl Sun Dome cover. F. Fold back the bracket jackets so that
you can easily insert the rafters. See Figure 6.
|
H. Each bracket should have an angle of 60 degrees. The angle can be corrected, if needed, by inserting a rafter and bending the bracket up or down, as needed.
I. A sample of a 60 degree angle is below.
Cut out and tape to a piece of cardboard, then trim the cardboard to the
angle. You can then place the 60 degree angle next to each
bracket. See Figure 7.

CUT OUT AND TAPE TO CARDBOARD
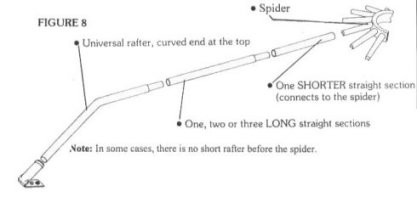
A. On the ground next to the pool, assemble
all rafters. (Refer to the illustrated parts list for an an example
of your dome) Most assemblies will resemble the example shown in
Figure
8.
CAUTION!!!
Check the top of the spider for burrs or rough spots on the casting. If you find any, file or sand them smooth with a file or sandpaper. Rough spots or burrs can damage the vinyl cover.
B. Before installing any rafters, you must now refer back to the measurements that you took across the pool. Find your longest distance across the pool from vertical support to vertical support. This is where you will put up your first set of rafters.
C. Place two rafter assemblies opposite each other on the spider.
Helpful tip: Tape the first set of rafters on to the spider with silver duct tape to prevent them from turning or falling out while you are putting them up.
D. With one person holding each rafter end
and pushing towards the spider, carfully lift and walk the assembley over
the pool at the longest measurement. Place the rafters in the mounting
brackets. See Figure 9
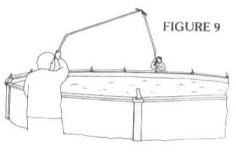
Helpful tip: Taping each joining point of
the rafter set, with silver duct tape, will make it much easier to install.
| NEXT PAGE | MAIN PAGE |