Installing New Inground Pool Liners

Wrong type of pool? See above ground pool liner installation instructions.
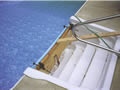
Every year we sell hundreds of inground pool liners directly to homeowners who carry out the installtion themselves (example: pool liner installation photos). Our years of experience have allowed us to create these DIY (Do-It-Yourself) instructions that work in the majority of cases and can be adapted for unique situations. Be sure to read these instructions a few times prior to liner installation. This will make your pool liner installation go as smooth as possible.
 |
POOLS W/ FIBERGLASS STEPS... Read these additional instructions |
Preparing For The Pool Liner
Draining Your Pool
Ideally, the pool should not be drained until very shortly prior to installation of the new liner. This reduces the chance of a cave-in or the material beneath the liner drying out. If the pool must be drained to measure for a new liner, the old liner should be put back into place as best as possible to keep the sun from drying out the sand or vermiculite base. Measuring your pool without draining it is easy if the water is clear. When the pool is emptied, care must be taken to avoid damage while pumping! The pool water should be pumped into a natural drainage system (creek, ditch, storm sewer, etc.) or to the street, allowing the water to (again) flow into the storm sewer system. Remember, you do not know where the water is going when it just soaks into the ground. It can channel back underground and damage your pool or your home. ALWAYS BE SAFE WHEN PUMPING WATER.
Removing The Old Liner
First, using a knife or a pair of scissors, cut out from around all fittings (lights, skimmer, return lines, etc.) thus freeing the liner from these areas. Next, check the liner track which is at the top of the pool wall. If the liner track is aluminum, you will probably see a gray locking strip around the perimeter of the pool at the very top edge of the liner. Remove this gray strip, clean it well and keep it to put back in place when the new liner is installed. If the track is aluminum, you may now remove the liner from the track, fold it up and discard. IF THERE IS NO GRAY LOCKING STRIP, this tells you that the liner track is probably plastic. In the case of a plastic track, you should make a pass with scissors around the entire perimeter of the pool and cut the old liner loose about six inches below the top of the pool wall. Fold the old liner up and discard as above. At this point, grab the six inch flap that remains, from the bottom edge, and gently pull upward. The liner will now come out of the track. Using this method on a pool with plastic track will reduce the possibility of breaking or cracking the lower lip of the track. You cannot see this lip with the liner in place, but the liner cannot stay in the track if this lip is damaged, so protect it.
Cleaning The Track
The liner track must be free of debris in order for the new liner to properly fit into it. Cleaning the track can be accomplished by clamping a small Allen Key into a pair of vice grips and inspecting the track and where necessary, using the Allen Key to loosen any debris frozen inside the track. Then, using a shop vacuum, suck out all debris from the track.
Creating An Air Seal
Using Duck Tape or Silicone Sealant, seal all cracks in fiberglass and wood walled pools. Concrete and block walled pools will already be sufficiently air tight.
Removing Fittings
At this time, you are ready to remove the face plates from the fittings. This is a very important phase as you want to make sure all the face plates will go back in securely when the new liner is installed. If any screws break, drill them out and re-tap the hole. It is best to drill and tap over-sized, up to 1/4 x 20, to insure a solid fitting when the face plate is re-installed. Check all gaskets. If they are bad, cut new ones. All plastic return line face plates should be replaced. New return line face plates are generally readily available. If a skimmer face plate needs replacing and is not available, it can be hand made out of stainless steel, plastic or acrylic in a shop specializing in this kind of work.
Inspect Your Pool Wall
All burrs, etc. which may protrude into the new liner should be removed from the pool wall. You can flat blade the pool wall with a steel trowel and generally knock debris loose. Bad lumps may require grinding or rubbing with a concrete block.
Preparing The Pool Base
The pool base must also be free of all items that would protrude into the liner. In the case of a sand bottom, remove all rocks and foreign matter, wet the sand and trowel into place. A Bull nosed, steel floats work best for trowling. The sand should be a fine grade (Plaster sand if available) and a minimum of two inches thick in all areas. In the case of vermiculite base, patch all rough areas with a mixture of one part Portland Cement to three parts of Vermiculite Pool Base, adding water and mixing until the mixture is smooth and easily workable. Trowel to a smooth finish. Again, bull nosed, steel floats work best. NOTE: It is not necessary to allow the patch work to dry before installing the liner. In fact, you will achieve a better bond and cure if the liner is installed with the patch work wet. Just avoid dragging the liner over wet surfaces. Sweep, then vacuum the pool base thoroughly after patching. Any foreign matter left on a solid pool base will protrude into the liner. Take your time and be sure to get it as clean as possible.
Installing The Pool Liner
Putting The Liner In The Hole
If there are inside gaskets on the flanges of the pool fittings, secure them in place. Place the liner box at the shallow end of the pool with the arrows pointing toward the deep end. Remove the liner from the box, keeping it in the same position as when boxed. Unroll the liner to the width of the pool. Take the leading edge of the liner and start pulling toward the deep end. It is best to have three or four people standing along each side of the pool to hold on to the liner as it is being pulled past them. This will keep the liner up in the air and avoid dragging it on the pool bottom and destroying the lay of the sand, or in the case of a solid base, avoid "burning" the liner by dragging it or roughing up the patch work.
Aligning Your Liner:
Align the deep end corners first. In the case of rectangular pools, boomerang shaped pools, or pools with corners of any kind, alignment should begin at these corners. Look at the liner wall. On a square corner, the corner of the liner is obvious. Exact alignment is critical. In the case of radiuses corners, again look at the base of the liner wall. You will see a series of "buttons" at the base of the liner wall at the corners. The size of the radius will determine the number of "buttons". Align the center "button" with the centerline of the corner radius of the pool. If there are an even number of "buttons", straddle the two middle "buttons" on the centerline of the pool radius. Insert the liner into the track at both deep end corners. Once the deep end corners are aligned and set, insert the liner into the track in one or two places along the deep end wall. It is not necessary to run the liner into the track continuously at this time as further adjustment may be required. Now, loosely fit the liner into the track every three or four feet, working your way toward the shallow end. Align the shallow end corners and fit the liner into the track in these corners. Once all corners are properly aligned, insert the liner completely into the track around the entire perimeter of the pool. The liner can move slightly during this process, so, again double check corner alignment. If there is excessive liner perimeter, this material can be "lost" by working the material back against itself inside the track. Material can be gained by pulling, or stretching the liner at the bead as it is fed into the track. The gray locking strip (if called for) should be re-inserted after the liner is properly positioned. At no time should hard tools be used to either insert the liner or the locking strip into the track! Difficulty in inserting the liner or the locking strip indicates debris remaining in the track or compressed track. Note: The centerline of the liner will be marked on ovals and teardrops. Kidney and odd shaped liners will be marked as per instructions given at the time of order. Once the liner is in place, run your thumb along the entire top perimeter of the liners to make sure the beading is completely in the track all around.
Vacuum Fitting The Liner
Using a Wet-Dry-Shop vacuum, remove the deck plate and run the suction hose down through the skimmer and out approximately 18" through the mouth of the skimmer, so that the suction hose is between the pool wall and the liner. Pack the skimmer hole with damp rags to create an air seal. Turn on the vacuum and allow it to suck the liner down tight. The time this will take will depend on the size of the pool and the air tightness of the pool wall. Once the liner is drawn down tight, any wrinkles which may appear in the area(s) where the liner is making contact with the pool base should be worked into an area where the liner has a void behind it; so that the weight of the water will make the liner lay flat. This can normally be accomplished by "tapping" the liner (vacuum still running) from the top side with a soft push broom, or by leaning over the top of the pool wall (on your stomach) and either pulling on the liner or "tapping" the liner with the palm of your hands. Common sense is required in getting the liner wrinkle free. If the material has bunched up coming up the deep end slope, grab the liner wall at the shallow end and pull as hard as possible, pulling that excess material up the throat of the pool and losing it at the base of the shallow end wall. Be satisfied that all wrinkles are out of the liner, or that they will come out with the weight of the water pressing against the liner. After the liner is sucked down, the vacuum may start trying to suck the liner into the vacuum hose. Should this occur, break the seal slightly by running your hand through the rags in the skimmer and creating a hole. This will allow the vacuum to pull some air from the top side. Do not break the seal to the point to where the vacuum is not properly holding the liner in position.
Filling The Pool
Only when the above conditions have been satisfied should filling of the pool begin. Leave the vacuum running and begin filling. If the pool has a main drain, allow about 18" to 24" of water to accumulate at the deep end before securing the face plate to it. You should be able to see the outline of the main drain showing through the liner. Turn the water off and walk down (wearing only socks) and screw the gasketed main drain face place into place. THE LINER WILL BE VERY SLICK! It is best to have a helper on the top side with a pool pole. He can hold the pole for you and you can walk down the slope backwards, pulling against the pool pole until you reach the low point. Repeat this process when exiting the pool. Think about falling and arrange any tools you may have on you so that, if you do fall, the tools will not damage the liner. Make sure the face plate is absolutely secure and gasketed before cutting the hole out of the middle.
Continuation Of Filling
Allow the pool to fill until the water level is high enough on the pool wall so that the liner is tight against the wall all around. AT THIS TIME, you may turn the vacuum off and remove the suction hose. The water should be at least half way up on a vertical pool wall before attempting to install the face plates. It is best to monitor the filling activity and install each face plate when the water is just about 4 to 5 inches below each one. Be sure to install the face plates securely with the gaskets properly positioned. Again, the face plates must be tightly screwed down before cutting the hole out of the middle!! Do not attempt to install these face plates prematurely. Unless all the stretch is out of the vertical liner wall, premature installations of the face plates will result in wrinkles around them and excessive strain on the liner at that point. Once the face plates are in place, the job is complete. Continue filling up to the mid point of the skimmer.
Care And Maintenance
Refer to the reverse side of your warranty card and always ask a professional if you are in doubt.
We Want You To Be Successful!
If any of the above confuses you, please feel free to call us at the toll free number below or your local dealer. Do not risk a mistake because you are afraid to ask a question.